23 September 2012

Thank Heavens Hard Boiled Eggs Aren't In Baked Goods

While grocery shopping today with my loving husband JD, I passed some packages of hard boiled eggs that I thought would taste great in the tuna salad I planned to make for tomorrow's lunch. Then I flashed back to all of the times I have attempted to hard boil eggs at home.

As any young woman would do, I started my hard boiled tenure by consulting The Joy of Cooking, where there are simple step-by-step instructions on how to deliver the perfect egg. And it worked. Once. Since then I have tried countless times to cook a hard boiled egg to perfection, and each attempt has ended in one of the following: hard to peel eggs, hard to peel eggs, and hard to peel eggs.

Now, I have consulted several sources to find out what I am doing wrong (since Joy is obviously not idiot-proof). I have read cookbooks, blog entries, Google answers, and magazine articles. I have consulted my mother, friends, co-workers, and my dog. I have started with cold water, warm water, eggs in at start, eggs in at boil, 5 minutes, 10 minutes, immediate boil, cold water, ice water, salt, new eggs, old eggs, peeling them hot, peeling them cold, peeling them room temperature, rolling the egg, cracking the egg, singing to the egg...But this time was different. This time I knew things were going to turn out. I just had a feeling. So, I passed up the immaculate pre-boiled eggs and headed home to my dozen raw eggs.

The first sign of trouble was the lack of eggs. There were only three. And one was cracked. There were only two. I would not be deterred.

I did not need Joy this time. I knew exactly what I was doing. So, I poured some water into a pot, put in my lovely two eggs, had a last minute change of heart, opened the book, poured out the water, put the two eggs at the bottom of the pot, filled the pot with water measuring one-inch above the eggs, noted that this was impossible due to the fact that the eggs were floating (is that a bad sign?), and put the pot on the stove to boil. Good start.

I was going to do this to the letter. Let the water boil, then immediately take the pot off and let the eggs sit for 12 minutes before pouring cold water over them to stop the cooking. But it would take a minute for the boil, so I decided to make my lunch for the next day, and use the restroom, and check out something on the computer...until JD yelled from the kitchen that the water was boiling. "For how long?" I asked. "I don't know," he replied. Sigh.

I rushed to take the lid off the pot, slid it off the burner and noted the time so I could return in 12 minutes to pour cold water over it. And then JD and I took the dog for a walk. It was a lovely walk: nice weather, a slight breeze, engrossing conversation, and an interesting new route. We returned in good spirits, and JD started to fix his chicken salad. As I looked at his shredded chicken, I thought to myself that I was glad my lunch was already made. Too bad for JD that I used the last two--EGGS. I forgot the eggs. Again.

I quickly took the now luke-warm pot and placed it in the sink to fill with cold water. Then I did what any self-respecting person would do in this situation: I placed the eggs in the freezer to cool faster (because that makes perfect sense at this point). Just for a few minutes. Just to cool them off so I can finish my tuna salad. To pass the time, I sat down to watch an episode of Cheers (we are watching from start to finish, all 275 episodes). When the episode ended, JD mentioned that dinner was ready whenever I was. I offered to get it since I had to finish my tuna salad with the two--EGGS! Seriously?!?!

They were frozen. The bottoms were sucked in and the yolks were glassy. Good thing I really only like the whites, and was able to salvage them for the tuna salad. Oh, I forgot to mention the actual peeling of the eggs: they peeled wonderfully. I do not know where along the way I found the magic answer to my peeling problem, but there it is. Perfectly peeled, salvageable eggs egg whites.

08 September 2012

The Great Peanut Butter Cookie Caper

It all started on a rainy day in Bloomington. The boys were brewing pumpkin ale, and I was facing hours of watching a boiling pot of mash. Then it hit me: I could convince my friend Lizzy to bake something. Anything. Turns out I did remember that early morning post about resurrecting my baking blog. Time to knock off some rust!

We set to the kitchen and pulled out everything in the cabinets that could possibly be helpful. We were motivated to bake, but not so motivated that we would consider going to the store for ingredients. It all could have ended there if Lizzy did not discover that we technically had all the ingredients for a peanut butter cookie recipe she found online. I say "technically" because we did not necessarily have the 2 cups of peanut butter needed. Details.


 Perhaps I would have been more suspicious of the flour-less cookie recipe had I not been distractingly dazzled by Lizzy's Kitchenaid mixer. Perhaps I would have stopped and thought about it when the mix was not getting all fluffy as the recipe suggested it should, had I not convinced myself that many of my baking misadventures actually turned into pretty darn good baked goods. In short, I was suffering from envy and pride. Stupid deadly sins.


Whatever it was, by the time I was ready to "roll the dough into a ball" it was painfully clear that a ball was not going to happen. More like a heap of goo. Again I was able to convince myself (and maybe Lizzy, but probably not) that although the so-called dough was not quite perfect, the cookies would most likely taste as they should. After all, we followed a recipe from Real Simple. The entire magazine is devoted to making awesome things simple. It's in the name.


Needless to say, it was almost immediately obvious that these peanut butter cookies were, well, not cookies. I even question whether they were peanut butter. What they definitely were:

1) hard

2) sticky

3) brittle

4) yes, sticky and brittle

5) slightly carmelized


One would think we would stop there, but oh no. We made two more batches! And yes, we hoped that each batch would turn out better than the last. We even switched from wax paper to cooking spray, just to see if perhaps it would make a difference. The only difference is that it was more difficult to pry the sticky brittle brown substance off of the sheet. By the third batch I disregarded the formality of making separate goo mounds and just poured the remaining "dough" into the center of the baking sheet. When you're beat, you're beat.


So what happened, you ask? Well, first of all is the obvious: I was not drinking wine. My only other thought is that there perhaps should have been flour involved. 


Lessons learned:
1) Always drink wine when baking. Always. It helps one think more clearly.
2) Kitchenaid mixers ≠ easy bake oven accessories
3) If you have doubts about something missing in a recipe, follow your gut (although I do not know if I would have had any clue how much flour would have been needed; nor do I know if mine is a gut that should be followed).
4) Sometimes you just have to cut your losses and enjoy the mad scientist results of your baking experiment.


29 August 2012

Oh Yeah, This Thing

So, it's 2:30am EST and I cannot sleep. Lying in a lodge bed at Cumberland Falls State Park, I decided to check out my Internet bookmarks. Sometimes you find lost treasures there...like my blog. It turns out that I have not posted anything since I moved to Louisville last June. It is not that I have not baked in that time--I am positive I made lemon bars once, and oh look! I found a picture of a Derby Pie I am pretty sure I baked for my mother's birthday:


It is just that there are a couple of things working against me now:

1) an electric oven/stove (sigh)
2) the absence of Eli
3) my new job keeping me away from home
4) my new co-workers being all "healthy" (where are my St. V's folks when I need them?)
5) a lack of desire to bake for all of the above-stated reasons.

However, after reading through all my old posts amidst sleep deprivation, I have become somewhat nostalgic and therefore am writing this post. There is a part of me that wants to make a bold sweeping promise of a baking resurrection.

I will refrain.

This may very well be the last post written for another year. There is a solid chance I will completely forget about the whole thing tomorrow morning, and during another sleepless night in the future will decide again to venture into my obviously useless Internet bookmarks, where I will see this blog and, annoyed, think to myself, "Ugh. Why does the Internet save everything?"

15 April 2011

Uneventful Brownie-Making

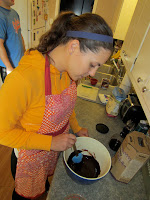
Let it be known (if it is not already obvious), that I have traded in baking-as-hobby for baking-as-necessity. So, when my friend Megan's wedding shower required me to contribute to the pitch-in, I called up my trusty baking assistant Eli and set to work on my first (and definitely not last, as I am making them again tonight) attempt at homemade brownies.

I took a chance on a recipe from food.com called "Whatever Floats Your Boat Brownies." It looked simple enough and the 1000+ reviews were all superlative. Plus, the ingredients were all mostly already in my kitchen. When Eli arrived with her brand-new adorable as all get-out apron (you're welcome, Eli) and the ever-important boxed red wine, we got baking. Eli, being a gimp, was surprisingly helpful at cleaning the baking tools...

 And removing egg shells from the cup of eggs she so expertly cracked...


We will blame the gimp hand.


Meanwhile, I measured and mixed...and mixed...and handed it over to Eli to mix...and then mixed some more.


And that is all she wrote.
Really, it was shockingly uneventful. Nothing went wrong. I did not mess up even once. I apologize.


Everything mixed evenly, fit exactly into the pan, and baked perfectly. The brownies were true to their reputation and turned out especially fudgy and gooey. Yum. They were a hit at home and at the shower. Other than the 20 grams of fat per serving (which is utterly amazing to me), they truly may be the perfect brownie. Plus, you can add whatever floats your boat!


Oh yeah, and JD made pizza. It was delicious too.


Lessons learned:
1) Brownies are easy to bake.

27 March 2011

White Cake with Strawberry Butter Cream Icing

This baking venture may have been doomed from the start. From prep work to finishing touches, I never quite had a handle on the situation. In the middle of the four-hour fiasco, I just started laughing. Little else could have possible gone wrong.
First there was the matter of the butter. After sitting out all day, the butter was not yet soft, and I had not yet developed patience. So I did the only reasonable thing and attempted to soften three sticks by the dining room heat register. Then I promptly forgot about them...


Did I mention that I left them to melt on top of a bowl of egg whites? Well, I did.


Moving on: After managing to salvage my butter and egg whites, I attempted to mix my dry ingredients with a hand mixer. I mixed, and mixed, and mixed. For TWENTY minutes I mixed. It became obvious that my half-melted butter was not going to cut it, so I nixed the hand mixer and tried mashing the ingredients by hand. After another ten minutes, I had a somewhat clumpy cake batter. Good enough.


 While I let the three layers of now-questionable cake bake in the oven, I set to the strawberry butter cream icing. Believe it or not, I dismissed the option of using strawberry jam, and actually opted to try this from scratch. Shocking, I know. First I hulled, pureed, and mashed the strawberries. So far so good.


 Next came the reduction, which also went without incident. Remarkably. The next trial occurred when constructing the rest of my icing, which seemed to need more strawberry reduction than the recipe implied. Laziness again set in, and I decided it was good enough. I really should be known as "The Mediocre Baker." I may change my blog name to include this more apt description.


After the cake came out of the oven (unevenly baked of course) it was time to ice. At this point, I had been making this cake for three hours. That is ridiculous. Just saying. However I mustered up some patience and put to use what I learned from my last cake: do not attempt to ice until the cake is completely cool. The first right move of the evening, I think. The cake was still incredible difficult to ice, with such thick frosting; however I managed a half-mangled rendition of my first (and maybe last) butter cream cake. Apparently it tasted delicious (or at least that is what I was told by co-workers, who ate the entire thing). So, I will consider this venture a success. Just don't look too closely at the cake.


Lessons learned:
1) Butter takes more than a day to soften.
2) Softening butter via register on top of a bowl of egg whites is a horrible idea.
3) You can never have too much strawberry.
4) Butter cream icing is, just as its name implies, very very buttery. I do not like it.

14 March 2011

Kentucky Bourbon Balls

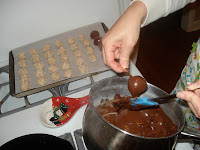
I don't want to talk about the bourbon balls.


Lessons Learned:
1) The type of chocolate you use matters. A lot.
2) I am capable of the same meltdowns I had as a child.

21 November 2010

Pumpin Pie -or- Why I Should Listen to Food Network Hosts When They Say They Use Canned Pumpkin

My Green Bean Delivery bin had been offering pie pumpkins, so I thought to myself, "I should bake a pumpkin pie from scratch!" and went ahead and ordered two. I suppose I was feeling in the holiday spirit with Thanksgiving just around the corner. So much so, that I thought further to myself, "And I'll make the crust too!" Although I did not amend my original stupid idea of baking a pumpkin pie from scratch, I did quickly change from traditional pie crust to the equally yummy yet much much easier graham cracker crust. My first and last wise move of the venture.

Like most of my baking adventures of late, the evening started when my baking assistant Eli arrived in a fully coordinated baking outfit and brought with her the standard baking necessities: authentic Italian truffle honey, Iberico cheese, and boxed red wine.


The pie started simply enough with a successful attempt at a graham cracker crust. I will remember that I must only bake pies that go well in a graham cracker crust.


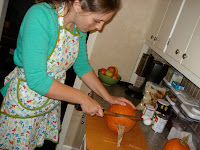
Next I tried in various ways to hack my way into the first pie pumpkin. This was the beginning of a very long and arduous learning experience. After I eventually cracked the first pumpkin shell (with a butcher knife in the end), I found myself facing its guts. It was explained to me that my next task was to remove all seeds and strings and cut the pumpkin meat into chunks for boiling. So, I reached in and started to work. First with my fingers, then with a spoon, then with my fingers again, then a spoon, then a knife. 


After approximately 15 to 20 minutes of cursing and drinking (and minimal gut extraction), my invaluable assistant suggested slicing the pumpkin like cantaloupe and then paring the string from each slice. Genius.


Next step: boiling the pumpkin meat and then removing the skin. My assistant at this point showed her severe lack of patience.  Apparently it was problematic for her to wait for the pumpkin to cool before paring, so she blew on it, placed it in the freezer, and eventually settled on torturing me by insisting that we pare the pieces while they were still scorching (and it turns out I have sensitive fingers). 


After eating a delicious dinner of curried chicken prepared by JD, I returned to my pie making. I was in need of a potato masher and had none. I briefly entertained using my blender to mash the pumpkin, but then I decided to be a purist and just went at it with my fists. 


I would like to say that it was then that I found the satisfaction of digging into my baking full-force, but that would be a lie. It was squishy and slimy and unpleasant; however, I did gain satisfaction from my efforts. The result was a pumpkin pie filling with fairly even consistency. I hear this is a rare skill (and the reason why Food Network hosts use canned pumpkin). Take that, Food Network Hosts. 


After some now-forgotten time in the oven: viola, pumpkin pie! And not too shabby, if I do say so myself. I had never had real pumpkin pie, and I was told that it would taste a little different from what I was used to. It did. It was awesome. I may or may not undergo this particular baking venture again in the future, but I am glad that I conquered the traditional pumpkin pie at least this once. It was enjoyed with an equally traditional topping: Cool Whip.


Lessons learned:
1) Baking instructions can make very complicated and difficult tasks appear easy and simple.
2) You never know when you will need the butcher knife that has been laying unused in a kitchen drawer for almost 10 years.
3) Pumpkin pie needs to cool in order to firm. Do not lose heart.
4) Boxed red wine from Target is surprisingly drinkable and one should be careful since it is difficult to tell how much has been consumed due to its opaque packaging. Hint: probably more than you thought.